 a journal of interesting technical ideas . . . a journal of interesting technical ideas . . .
This is a long post, but most of it is file contents. Keep reading!
GNS3 appliance files are descriptions of virtual machines used in network simulations. The appliance files have suffixes of .gns3a and are included with the GNS3 download. You can update the files and create new ones. The goal of this article is to walk through the process of working with appliance files and contributing them back to the community.
On a personal note, submitting a new GNS3 appliance was the first time I contributed to an open-source project. I’m still learning, but a few years ago I knew nothing. Jeremy Grossman, with GNS3, was patient and helped me understand the process of using Git. Contributing - even in this minor way - was a real high for me and I’d love for you to be able to share that feeling and contribute to this and other projects. GNS3a was my “gateway drug” into being a contributor and not just a consumer of open source.
One of the files I’ve contributed is the Security Onion appliance. Security Onion is a Linux distribution that focuses on security tools. Below is the current version (9/1/20) of the GNS3A file. Before we create a new appliance, let’s update this one.
Before you give up, run this checklist:
Sometimes, a simple restart can resolve the issue. Close the game and restart your PC. This will ensure that any temporary issues are resolved, and your game client is refreshed.
Before attempting any troubleshooting steps, check the official Sniper Elite 3 server status page to ensure that the servers are online and not experiencing any issues. You can also check the game's social media channels or forums to see if other players are experiencing similar issues.
The “Connection to the game failed” error in Sniper Elite 3 is almost always a local network issue, not a bug in the game itself. By opening the correct ports, verifying your NAT type, and temporarily disabling IPv6, the vast majority of players can get back to blowing up Führers from 500 meters.
If you’re still stuck after these steps, Rebellion’s support knowledge base (archived at rebellion.com/legacy-support) contains additional router‑specific guides.
Have you encountered this error on a specific platform? Share your experience in the comments below.
The "Connection to the game failed" error in Sniper Elite 3
is a common issue that typically stems from network configuration conflicts, firewall blocks, or corrupted game files. Top Fixes for Connection Failures
Verify Game Integrity (Steam): Corrupted files often cause lobby and connection issues. In your Steam Library, right-click Sniper Elite 3, select Properties > Local Files, and click Verify Integrity of Game Files.
Whitelist the Game in Firewall: Ensure that both the game launcher and the main executable are allowed through your firewall. On PC, manually add SniperElite3.exe (found in the game's /bin folder) to your Windows Firewall allowed apps.
Run as Administrator: Launching the game with administrative privileges can bypass many permission-related connectivity blocks.
Network Port Forwarding: If you are behind a router, you may need to forward specific ports to enable a stable connection. For Steam, these include: TCP: 8766, 27010, 27015-27016, 27036 UDP: 8766, 27010, 27015-27016, 27031-27036 sniper elite 3 connection to the game failed top
Check NAT Settings: A "Strict" NAT type is a frequent cause of matchmaking failures. Aim for an Open NAT (Type 1) for the best results. If you cannot change this in your router settings, contact your ISP about obtaining a Static IP.
Sync Game State Before Inviting: For co-op, ensure both players have the game fully loaded to the main menu before sending or accepting an invitation.
Update Platform Software: Outdated console firmware (Xbox/PlayStation) or Windows versions can interfere with online services. Check for system updates in your platform's settings. Platform-Specific Considerations
PC: If the game crashes at startup or fails to join lobbies, try deleting or renaming the Steam API files (steam_api.dll and steam_api64.dll) and then verifying your game cache through Steam.
Console: For PlayStation players, restoring licenses via Settings > Account Management > Restore Licenses can sometimes fix persistent "Connection Failed" messages.
For official support, you can visit the Rebellion Support Portal.
Are you experiencing this error on PC, Xbox, or PlayStation, and does it happen specifically in co-op or multiplayer? cant connect to coop :: Sniper Elite 3 General Discussions
Sniper Elite 3. ... The author of this topic has marked a post as the answer to their question. Click here to jump to that post. . Steam Community cant connect to coop :: Sniper Elite 3 General Discussions
The "Connection to the game failed" error in Sniper Elite 3 often stems from firewall blocks, outdated game files, or NAT type issues. Top Troubleshooting Solutions Configure Windows Firewall Manually add the game's main executable ( SniperElite3.exe ) to your firewall's allowed apps.
: Do not just allow the launcher; navigate to the game folder (usually Steam\steamapps\common\Sniper Elite 3\bin ) to find the actual game file.
Both players in a co-op session should ensure these exceptions are in place or temporarily disable their firewalls to test the connection. Run as Administrator Right-click the Sniper Elite 3 launcher or executable and select Properties Compatibility tab, check Run this program as an administrator Verify Game Integrity In your Steam library, right-click the game > Properties Installed Files Verify integrity of game files Before you give up, run this checklist:
Restart your computer after verification to ensure all changes take effect. Check NAT Type and Port Forwarding Ensure your NAT type is set to in your router settings.
For Steam users, forward the following ports if you continue to experience timeouts: : 8766, 27010, 27015-27016, 27036 : 8766, 27010, 27015-27016, 27031-27036 Platform-Specific Checks Console (PlayStation/Xbox)
: Verify your system software and the game are fully updated. For PlayStation, ensure your PS Plus subscription is active. DLC Installation
: If the error occurs when accessing specific content, ensure all DLC packs have finished downloading in the background, which can sometimes take over an hour. cant connect to coop :: Sniper Elite 3 General Discussions
The "Connection to the game failed" error in Sniper Elite 3 often stems from misconfigured firewall settings, corrupted game files, or NAT type restrictions. Common Fixes for PC Players
If you are playing on Steam, these steps frequently resolve co-op and multiplayer connection issues:
Verify Game Integrity: Right-click Sniper Elite 3 in your Steam Library, select Properties > Local Files, and click Verify Integrity of Game Files. This replaces missing or corrupted data that may prevent a connection.
Run as Administrator: Locate the game’s executable file (often in the bin folder) and set it to Always run as administrator. Launching the game directly via Sniper3Launcher.exe rather than through the Steam UI has also fixed co-op for some users.
Firewall Exceptions: Ensure both SniperElite3.exe and the game's launcher are allowed through the Windows Firewall. Some players report that both participants in a co-op session must disable their firewall temporarily to connect.
Port Forwarding: If you still cannot connect, ensure your router is forwarding the specific ports required by the game on Steam: TCP: 8766, 27010, 27015-27016, 27036 UDP: 8766, 27010, 27015-27016, 27031-27036 Troubleshooting for Consoles (Xbox & PlayStation)
For those on Xbox or PlayStation, connection failures are typically network or subscription-related. Sometimes, a simple restart can resolve the issue
Check Subscription Status: Online play requires an active PlayStation Plus or Xbox Game Pass (Core or Ultimate) subscription.
NAT Type: Ensure your NAT type is set to Open. A "Strict" NAT type can block you from joining peer-to-peer lobbies.
System and Game Updates: Verify that both your console software and the game itself are fully updated.
Power Cycle: Unplug your console and router for one minute to clear temporary network cache. General Co-op Tips To improve the success rate of joining a friend: cant connect to coop :: Sniper Elite 3 General Discussions
Sniper Elite 3. ... The author of this topic has marked a post as the answer to their question. Click here to jump to that post. . Steam Community
You need to tell your router to let SE3 traffic through. This is the #1 solution for the "Connection failed" error on console and PC.
For PC & Console (UDP): Log into your router (usually 192.168.1.1) and forward the following ports to your device’s static IP address:
Pro Tip: If you don't want to port forward, enable UPnP (Universal Plug and Play) in your router settings. SE3 uses UPnP to request ports automatically.
A Strict or Moderate NAT type will prevent connections.
Rebellion Developments’ Sniper Elite 3 remains a popular tactical third-person shooter, but players on PC, PlayStation, and Xbox occasionally encounter a frustrating roadblock: the “Connection to the game failed” error when trying to join a co-op or multiplayer match. This article breaks down the most common causes and provides step-by-step solutions.
There is a specific, infamous bug in SE3 involving the "Authenticating" message followed by the fail. This usually happens in the Overseas (DLC) missions.
Most of this is pretty straight forward. The structure looks like:
A descriptive section
Next is the Qemu section that describes how the VM environment should be constructed. This is straightforward as well. Console types are VNC or telnet. You may have to try different ethernet adapters to see what works, but I recommend starting with the Intel e1000 because this model is supported by most VMs. Using a para-virtualized adapter may give better performance, so you may also want to try vmxnet3. Most architectures will be 64bit and RAM requirements will usually be on the website.
That leaves two sections - Images and Versions. There should be a matching entry in both places. The images section is a list of virtual hard drives and CD-ROM images to use in the VM and includes:
Let’s update this file. There are a lot of old images listed as options. I’ll remove the image and version sections for 14.04.5.3 and add the most recent (16.04.7.1). That will leave users with the last 14.x and two images in 16.x including the latest. Whether dealing with a distribution or a commercial image, changes made between versions may introduce new processes or bugs so leaving some older images gives users an easy workaround. Here’s the updated file. Scroll below the output for a discussion of submitting this back to the project.
{
    "name": "Security Onion",
    "category": "guest",
    "description": "Security Onion is a Linux distro for intrusion detection, network security monitoring, and log management. It’s based on Ubuntu and contains Snort, Suricata, Bro, OSSEC, Sguil, Squert, ELSA, Xplico, NetworkMiner, and many other security tools. The easy-to-use Setup wizard allows you to build an army of distributed sensors for your enterprise in minutes!",
    "vendor_name": "Security Onion Solutions, LLC",
    "vendor_url": "https://securityonion.net/",
    "documentation_url": "https://github.com/Security-Onion-Solutions/security-onion/wiki",
    "product_name": "Security Onion",
    "product_url": "https://securityonion.net/",
    "registry_version": 3,
    "status": "stable",
    "maintainer": "Brent Stewart",
    "maintainer_email": "brent@stewart.tc",
    "usage": "Your default account will have sudo priviledges.  Squil and Squert username and password are configured in the Setup wizard.  MySQL root is set to null.  For more info see https://github.com/Security-Onion-Solutions/security-onion/wiki/Passwords.",
    "symbol": "securityonion-logo.png",
    "qemu": {
        "adapter_type": "e1000",
        "adapters": 2,
        "ram": 3072,
        "arch": "x86_64",
        "console_type": "vnc",
        "kvm": "allow"
    },
    "images": [
        {
            "filename": "securityonion-16.04.7.1.iso",
            "version": "16.04.7.1",
            "md5sum": "6bd811a05c1ec7973b8fca5c34cec13e",
            "filesize": 2132803584,
            "download_url": "https://github.com/Security-Onion-Solutions/security-onion/releases/",
            "direct_download_url": "https://github.com/Security-Onion-Solutions/security-onion/releases/download/v16.04.7.1_20181010/securityonion-16.04.7.1.iso"
        },
        {
            "filename": "securityonion-16.04.6.1.iso",
            "version": "16.04.6.1",
            "md5sum": "ca835cef92c2c0daafa16e789c343d1d",
            "filesize": 2020605952,
            "download_url": "https://github.com/Security-Onion-Solutions/security-onion/releases/",
            "direct_download_url": "https://github.com/Security-Onion-Solutions/security-onion/releases/download/v16.04.6.1_20181010/securityonion-16.04.6.1.iso"
        },
        {
            "filename": "securityonion-14.04.5.4.iso",
            "version": "14.04.5.4",
            "md5sum": "9c7cab756b675beb10de4274a3ad3bc6",
            "filesize": 1874853888,
            "download_url": "https://github.com/Security-Onion-Solutions/security-onion/releases/",
            "direct_download_url": "https://github.com/Security-Onion-Solutions/security-onion/releases/download/v14.04.5.4_20171031/securityonion-14.04.5.4.iso"
        },
        {
            "filename": "empty30G.qcow2",
            "version": "1.0",
            "md5sum": "3411a599e822f2ac6be560a26405821a",
            "filesize": 197120,
            "download_url": "https://sourceforge.net/projects/gns-3/files/Empty%20Qemu%30disk/",
            "direct_download_url": "https://sourceforge.net/projects/gns-3/files/Empty%20Qemu%20disk/empty30G.qcow2/download"
        }
    ],
    "versions": [
        {
            "name": "16.04.7.1",
            "images": {
                "hda_disk_image": "empty30G.qcow2",
                "cdrom_image": "securityonion-16.04.7.1.iso"
            }
        },
        {
            "name": "16.04.6.1",
            "images": {
                "hda_disk_image": "empty30G.qcow2",
                "cdrom_image": "securityonion-16.04.6.1.iso"
            }
        },
        {
            "name": "14.04.5.4",
            "images": {
                "hda_disk_image": "empty30G.qcow2",
                "cdrom_image": "securityonion-14.04.5.4.iso"
            }
        }
]
}
In GNS3, go to File > Import Appliance and make sure that your appliance imports correctly. GNS3 will provide guidance if there’s a formatting error. Looking at the JSON above, you can imagine that a common mistake is unmatched brackets!
If the GNS3a file loads, test it by creating an instance. You need to test at least any new versions you added. Make sure the appliance boots without error and that expected interfaces are available.
Once the pieces are working, submit the appliance to the community by cloning the GNS3-registry on Github and adding in your file.
git clone https://github.com/GNS3/gns3-registry.git
If you’ve already cloned it, make sure that your branch is up to date. Upstream is the original source (in this case the GNS3 copy).
git fetch upstream
Two Python programs are included in the repo. Run them both on your copy before continuing. These are QA processes that look for issues before you submit. They will take a little time to run.
pip3 install -r requirements.txt   # this does __pip3 install jsonschma__ and __pip3 install pycurl__
python3 check.py
python3 check_url.py
Next push your local copy to your github copy. In Github terms, origin is your copy on Github, and master is the local copy.
git add .
git commit -m "Updated Security Onion"
git push -f origin master
Now we have an up to date local copy of the gns3-registry that includes our updated gns3a appliance and we’ve updated our fork on Github. Next, we offer our update to the project via a Pull Request. You are going to be one of the cool kids!
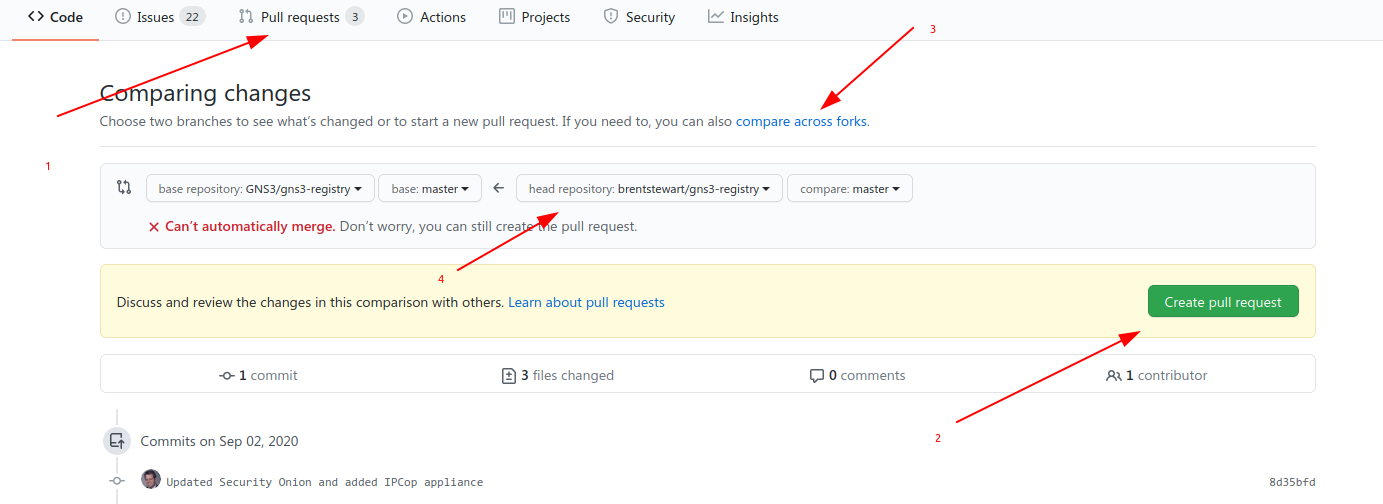 Go to the gns3-registry repository on Github and select the Pull Requests tab and click the big green New pull request button. Under Compare, select the link to compare across forks (since your copy is a fork) and select your fork. It should show you the changes to files so take a moment to digest that and make sure this PR is doing what you want. Finally, submit the Pull Request. Github will email you when there’s an update to the request. If the GNS3 team has a question, they’ll submit a comment on the PR and leave it open for you to resolve. Otherwise, it will get merged in and all the other GNS3 users will be able to enjoy your hard work!
Thanks!